When buying diamonds, knowledge of the four C's will help you effectively compare diamonds. T
he Gemological Institute of America (GIA) is the leading expert on diamond grading, and Adiamondisforever.com has a great interactive site
here.
1. Carat WeightLet's start with the easiest "C" - carat weight. Carat is often abbreviated as CT, and it is pronounced like a rabbit's favorite food, carrots. One of my customers made the remark, a 5.00 CT diamond would feed a lot more rabbits than a 0.50 CT (or 1/2 Carat). The most common Carat weight purchased is around 1.00 CT (around $3,000 and up, depending on the other C's).

The top of this
diagram tells us the "points" or carat weight. There are 100 points in a 1.00 CT diamond. We often use "points" when referring to diamonds smaller than 0.20 CT (or 1/5 CT). The bottom of the diagram tells us the size of the diamonds diameter in millimeters (mm). These millimeter sizes are approximated for each carat weight.
Confusion sometimes occurs with gold karat, abbreviated as K or KT. Gold karat measures the purity of gold, 24K is pure. There are 5 standard purities, 24K, 22K, 18K, 14K, and 10K. There is 18K, 14K, and 10K white, yellow, and rose (pink) gold because adding different alloys or metals brings down the purity of gold and brings out different hues or colors.
2. Color
The next easiest "C" is color because we can usually tell with our eyes if a diamond has a yellow tint. The following figures are from Khulsey and Blue Nile.

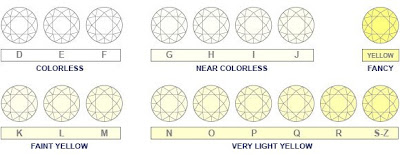
Here we can see the far left diamond has a nice "white," and is therefore in the "colorless" range while the far right diamond has a light yellow or champagne/brown tint. Different colors or "warmness" levels complement different skin tones.
Now let's put some letters to these colors so we can go beyond "white" or "yellow":
Diamond Color Designations
- D, E, F - colorless (white)
- G, H, I, J - near colorless
- K, L, M - faint yellow or brown
- N, O, P, Q, R - very light yellow or brown
- S, T, U, V, W, X, Y, Z - light yellow or brown

Now before you go and say, "Only the best for me or my gal, I want a D-color diamond," let's keep in mind that the
GIA estimates only around 600 D-flawless roughs are cut into gems weighing between 1 and 2 carats during a given year. I usually recommend a G or H color because of its price and "whiteness." An untrained eye can usually begin seeing the differences with an I (dull) or J color (slight yellow). When choosing between color and clarity (see #3), we recommend going for a better color. This is especially true for earrings or necklaces where it is harder for others to see inclusions once worn.

Here is another diamond color chart, which shows colors K-Z in more detail. Some people prefer a fancy yellow diamond for its vibrant canary yellow hue.
 3. Clarity
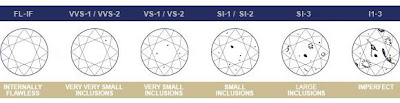
The next "C" is clarity, which tells us the relative number, size, and conspicuousness of natural flaws and inclusions. Once again, GIA are creators of the clarity scale and information can be found here. Although there are 11 clarity grades, we are usually working within four general categories. This grading system is universal and allows jewelers all over the world to communicate in the same "diamond language."
These two categories are not commonly found on the market:
- Flawless (FL)
No inclusions or blemishes are visible to a skilled grader using 10× magnification - Internally Flawless (IF)
No inclusions and only minor blemishes are visible to a skilled grader using 10× magnification
The four most common, general categories are as follows:

- Very, Very Slightly Included (VVS1 and VVS2)
Inclusions are difficult for a skilled grader to see under 10× magnification - Very Slightly Included (VS1 and VS2)
Inclusions are clearly visible under 10× magnification but can be characterized as minor - Slightly Included (SI1 and SI2)
Inclusions are noticeable to a skilled grader using 10× magnification - Imperfect (I1, I2, and I3)
Inclusions are obvious under 10× magnification and may affect transparency and brilliance
At Handiwork, we are usually working within four grades, starting from the top: VS-1, VS-2, SI-1, and SI-2. I usually recommend no lower than a clarity of SI-1 since it is still clean to the eye without noticeable black carbon, feathers, internal "scratches", or inclusions. Having inclusions is not a "bad" thing, they are simply "birthmarks" as GIA describes them. Like every human, every diamond has its own characteristics, which developed as it was growing in the earth.
Take a look at the chart below for a further detailed clarity scale:
 4. Cut
The last "C" is a diamond's cut. Cut can denote the shape of the diamond -- round, marquise, oval, pear, princess (square), radiant princess (rectangular princess), emerald (rectangular but reflects light differntly), heart, Asscher, or cushion (rounded princess).
Cut also refers to the resulting proportions of a diamond after it has been polished and cut. All diamonds are found "in the rough," and it is only with special tools and skills that the brilliance is brought out with facets.
Take a look at the "anatamony" of a diamond:

The "top" of the diamond is the table, while the "bottom" of the diamond is the culet. In old European cut diamonds, the culet is often ever so slightly cut off. A 1.00 CT round diamond could be cut in three different ways as shown below:
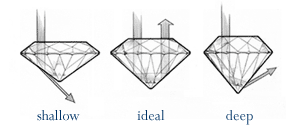
While a shallow cut diamond may look "larger" because of its larger table, this type of cut does not maximize the amount of light reflectected out of the diamond. Diamond is a material with one of the highest index of
refractions at 2.4175 (source), which is why a diamond sparkles more than crystal (refraction index of 2.0).
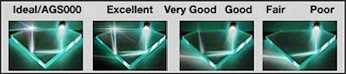
A proper cut will maximize this refraction as follows:
5. Certification
While this is not an official "C," it is a useful once, especially for diamonds over 2.00 CT. A diamond certification report meticulously details every birthmark (or lack of) under the eye of a trained, technical expert.
There are four big players when it comes to diamond certification. Starting with the best:
1. Gemological Institute of America (
GIA)
2. American Gem Society Laboratories (
AGSL)
3. International Gemological Institute (
IGI)
4. European Gemological Laboratory (
EGL)
All of diamond certification reports details these specifications:
Shape
Measurements
Weight
Depth Percentage
Table Percentage
Girdle Thickness
Culet Size
Polish
Symmetry
Clarity Grade
Color Grade
Fluorescence
Comments about Diamond
Plot of Internal and External Inclusions
If they all detail the same information, why is GIA the best?
GIA has been established the longest (1931) compared to EGL (1974), and they trademarked the International Diamond Grading System. GIA diamond certification reports are renowned for their precision and accuracy, and therefore, there reports are also the most costly.
The cost of having a diamond certified is several hundred (depending on Carat weight), so at Handiwork we find it is more cost effective to carry GIA and IGI certifications for our larger pieces only.
If this more technical post is a bit confusing, feedback on how to make it easier to understand would be much appreciated!


 Note: These diamond wedding bands take it up a notch with more diamonds. The man's has seven princess cut diamonds while the lady's band has prong set, round diamonds. The lady's ring is comfort fit.
 Note: These three wedding bands are called eternity bands because the diamonds go all the way around instead of only halfway. These eternity wedding bands are beautiful, and you do not have to worry about the band twisting to the non-diamond half of the band. Care, however, should be taken when wearing because the diamonds on the bottom could be damaged when the palm of the hand hits hard surfaces. One should also remember that eternity bands cannot be easily sized, and while we all do not want to gain or lose too much weight after marriage, sometimes it is hard to prevent (i.e. think about how great a cook your significant other is...)


